
Dexcom CGM Explained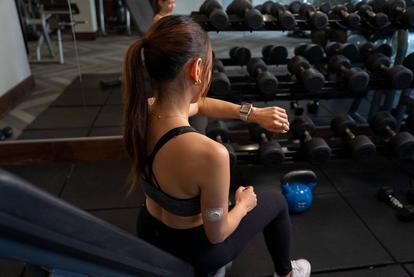
Are Dexcom CGMs Easy to Use and Painless?
Published: Apr. 30, 2026
Updated: Jul. 21, 2026
7 min read
The persistent stress and attention required to manage diabetes can feel like it dominates your daily routine. Frequent blood sugar checks with a traditional glucometer can interrupt work, family time, and activities you enjoy. The good news is that there’s an easy and painless alternative for managing your glucose levels with a CGM.
Unlike blood glucose meters (BGMs), Dexcom G7 and G7 15 Day Continuous Glucose Monitoring (CGM) systems make diabetes management easier without fingersticks* while showing your glucose levels in real-time. It provides data on where your glucose levels are, where they've been, and where they're heading.
Dexcom CGM Systems are Easy and Painless to Use
Dexcom prioritized comfort and simplicity in developing the Dexcom G7 and G7 15 Day systems, achieving remarkable user satisfaction rates. 96% of users report the G7 is easy to use1. Additionally, 94% find the sensors comfortable to wear throughout the entire session, with most users forgetting they're wearing it1. The device features a low-profile design for greater discretion, making it virtually unnoticeable during daily activities.
Does Dexcom G7 CGM Insertion Hurt?
Typically, Dexcom G7 insertion does not hurt. Patients reported that 94% of Dexcom G7 sensor insertion was painless (mild, no discomfort)1. Dexcom G7 and Dexcom G7 15 Day use a needle briefly for insertion—it doesn't remain in your body. The applicator uses a tiny, fast-acting needle to insert a flexible sensor wire under the skin. To activate it, the clear safety guard must be pressed firmly against the body— once engaged, a simple at push of a button deploys the sensor and the needle automatically withdraws. The stainless steel introducer needle is only a few millimeters long and typically won't draw blood.
Proper Dexcom G7 Sensor Application
If you’ve never seen someone insert a Dexcom G7 sensor before, 5-year-old Dexcom Warrior ZZ and his Mom demonstrate how easy and painless it is in this short video.
Placement Guidelines
Adults and kids (ages 2 years and older) can wear the Dexcom G7 on the back of their upper arms, while children between 2-6 years old have an additional option to wear it on their upper buttocks. The Dexcom G7 15 Day sensors are specifically designed for the back of the upper arm and approved only for adults 18 years and older. Research shows that back of the upper arm placement results in optimal performance1. It's helpful to rotate insertion sites with each new sensor to prevent irritation.

Site Selection Tips
Choose locations that are:
- At least 3 inches from insulin pump sites or injection areas
- Away from waistbands, scars, tattoos, irritation, and bones
- Unlikely to be bumped or compressed during sleep
Application Steps
Step-by-step instructions are included in the Dexcom G7 and G7 15 Day box and G7 app, and training videos can also be found on our website.
Begin by preparing the site with clean hands and disinfecting the area with an alcohol wipe. Proper preparation significantly improves sensor adhesion throughout the wear period. Ensure the skin is flat, clean, and completely dry before insertion, and remove any previous adhesive residue from earlier sensors. If needed, trim hair with electric clippers rather than razors to avoid skin irritation and skip lotions or moisturizers on insertion day to maintain optimal adhesion conditions.
The Dexcom G7 and G7 15 Day come pre‑loaded in their applicator, making application simple and straightforward. To activate it, the clear safety guard must be pressed firmly against the body—once engaged, a single push of the button deploys the sensor and the needle automatically withdraws. Be sure to use the included overpatch, as it helps provide secure attachment throughout the entire wear period. Remember to rotate sites with each new sensor to help prevent skin irritation and ensure optimal performance.
Setup and Pairing
After insertion:
- Use the Dexcom G7 app† or receiver
- Scan the QR code or enter the sensor code from the applicator
- Follow the setup prompts
- Your device will show a countdown for the next sensor change (with 12-hour grace period)
During Wear
Dexcom Warrior Melania shares her go‑to tip for Dexcom G7 sensor changes: “always start with clean, dry skin.” To help establish strong initial adhesion, keep the sensor dry for the first 12 hours when possible. If the sensor does get wet—especially after time in the pool or ocean‡—gently pat it dry to help absorb excess moisture around the sensor. Avoid rubbing or using heat to dry it. If edges begin to loosen, carefully trim them and secure with medical tape as needed. For additional support, you can request free overpatches from Dexcom or use a liquid adhesive prior to application if your lifestyle or skin type requires extra reinforcement.
The standard Dexcom G7 sensors last 10 days, while the G7 15 Day extends wear time to 15 days for adults 18 and older, requiring fewer sensor changes per month. This extended wear time offers greater convenience with less monthly waste with the same technology proven to improve A1C levels and increasing time in range2-6.
Understanding CGM vs. Blood Glucose Readings

CGMs measure glucose in interstitial fluid, which lies just below the skin, while blood glucose meters measure glucose directly in blood. This explains why readings at a particular moment in time may be slightly different, especially when glucose levels are changing rapidly—blood glucose changes occur before interstitial fluid changes. Readings align more closely when glucose levels stabilize. To learn more about the difference, watch this video.
Importantly, CGM offers the benefit of continuous readings versus a single point in time from a blood glucose meter. This helps make diabetes management easier by showing you the full picture of how your glucose levels are changing throughout the day and alerting you when you may need to take action. Hear more from pharmacist and diabetes educator Dr. Zakia Woods McManus, who compares CGM to having an “entire movie” of your day versus only “snapshots” with fingersticks.
Ready to Get Started on a Dexcom CGM System
Are you ready to experience painless, easy-to-use glucose1 monitoring with the Dexcom G7 or G7 15 Day system? The freedom from fingersticks*, combined with real-time glucose insights and trend arrows, empowers you to make informed decisions about your health while maintaining an active, fulfilling life.
*If your glucose alerts and readings from Dexcom G7 do not match symptoms or expectations, use a blood glucose meter to make diabetes treatment decisions. †Compatible smart devices sold separately. To view a list of compatible devices, visit https://www.dexcom.com/compatibility ‡The Dexcom G7 sensor is waterproof and may be submerged under eight feet of water for up to 24 hours without failure when properly installed. 1 Dexcom G7 and G7 15 Day User Guides, 2025 2 Beck, RW, et al. JAMA. 2017;317(4):371-378. 3 Beck RW, et al. Ann Intern Med. 2017;167(6):365-374. 4 Martens T, et al. JAMA. 2021;325(22):2262-2272. 5 Garg SK, et al. Diabetes Technol Ther. 2025;27(6):413-502. 6 Welsh JB, et al. J Diabetes Sci Technol. 2024;18(1):143-7.